Remove Broadlink's C1 password
Remove Broadlink's C1 password
Do you have broadlink's Altai C1 CPE/AP Device? Are you fed up of the service of broadlink and wanna use this device for other purpose? And you won't get the admin password to change the default setting...Device Details
Broadlink has using these devices as outdoor signal receiver which is placed to their customer premises to connect with their wireless station. To take their internet services the customer should buy the device with full cost but take the full control right themselves. They even wont give the device admin password to their customer on which the customer has invest the full amount. The device configuration is set on such a way even the user do hard reset the device that goes to the broadlinks default configuration, so customer wont use that device for other purpose or to join with other ISPs.
This is just like you bought the car but key is still on the hand of seller...very nasty.....
Broadlink uses Wireless Devices from Altai Technologies (Taiwanese company) from their wireless stations to outdoor receiver CPE placed on their customer home or offices.
The First One is ALTAI C1
 |
| Broadlink's C1 WiFi CPE/AP (WA1011C) |
Model: WA1011C
FCCID : UCC-WA1011C
Board : AP51
CPU : Atheros
RAM : 16 MB
Boot Loader: Red boot
Config: Ubnt, Busy box
FLASH: 8M
Radio: 2.4 Ghz
WAN: 1 Ethernet POE
Power: 12v (POE)
 |
| C1 Device Front & Back View |
Platform:
It is very hard to get firmware update file of this device, because the altai technology does not give the individual support for their vendors customer. They sell these devices in a bulk to such Broadlink like ISPs in many countries ... and so give the support only for them by creating private support login on their sites.
You may get the firmware link directly bypassing their support site...for eg: you may search on this link
http://www.altaitechnologies.com/wp-content/uploads/2013/10/Or get from this link:
Altai C1 CPE/Ap Wa1011c C1.v1.6.0.200.130617.1626.bin
https://drive.google.com/file/d/0B7pHAczHWJ6KZnI3aDhiOFpUZlk/view?usp=sharingUsing binwalk tool in linux the following information is displayed:
root@user#binwalk Wa1011c C1.v1.6.0.200.130617.1626.bin
DECIMAL HEX DESCRIPTION
-------------------------------------------------------------------------------------------------------------------
268 0x10C Ubiquiti firmware kernel partition
324 0x144 LZMA compressed data, properties: 0x5D, dictionary size: 8388608 bytes, uncompressed size: 1683516 bytes
487761 0x77151 Squashfs filesystem, big endian, version 2.1, size: 3899279 bytes, 891 inodes, blocksize: 65536 bytes, created: Mon Jun 17 14:22:05 2013
The header displaying ubiquiti firmware kernel. This device's system is of customized version of ubiquiti devices. They are supported by ubnt. But you can not get more support there. See the link of ubnt community:
https://community.ubnt.com/t5/Wireless-Networking/Any-info-on-C1-Altai-Device/m-p/401224#M34310
https://community.ubnt.com/t5/Wireless-Networking/Any-info-on-C1-Altai-Device/m-p/401224#M34310
Boot loader/File system layout
Atheros device uses two types of boot loader i.e. Redboot and U-boot. This device has Redboot boot loader. Connecting the device in serial console the device displayed following mtd partition.

Default ip , user and password
Altai c1 (international version) listen on 192.168.1.20
Altai c1 (broadlink's provided ) listen on 192.168.99.99
Telnet service is by default enabled listen on port no. 2223
root@root#telnet 192.168.99.99 2223
 |
| Telnet login on 192.168.99.99 2223 |
And try following user and password configuration to connect some may logged in but some may not.
Admin user
User Password
altai wag
admin admin
ubnt ubnt
root superwifi123
broadlink tumiikemonnachoo
Guest user
user user
user password
user guest
guest guest
guest password
This device has two types of user .. the guest user can't configure the device and can't use telnet service too. He/she can view the settings through web login and can update the device firmware.
If the above user and password combination is not matched then there is only one way of revealing the password by connecting the device through serial console.
For that you must have...
1. Putty for windows
Download free form here..its open source project
or
minicom for linux
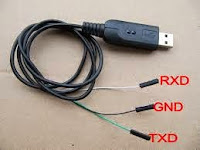
2. USB to serial TTL converter that operates both on 3.3v and Rx/Tx I/O level
It is hard to find in Nepali market, I have managed searching in ebay, finally brought through harilo.com who had delivered from USA & took 15 days.

 You may use one of these devices:

 You may use one of these devices:
 |
| USB to Serial TTL Converter 3.3v/5v I/O level |
3. You have to dissemble the device to connect with device serial pins
Disassembling and connecting serial pins of device:
 |
| Make two small scratches on sticker side by side at bottom |

2. Gently pull the inner part by catching the bottom part by one hand and outer part by another hand.
3. Find out serial pins VCC, TX, GND & RX as shown in picture.
 |
| See the pins & their position indicator Jp1(UART) |
4. Connect the serial pins with the usb to serial TTL converter device as following.
C1 Device USB to Serial TTL Device
GND GND
RX TX
TX RX
(Note: Don't connect VCC 3.3v pin, it will damaged your C1 device)
 |
| Connecting TX, GND & RX with converter RX, GND & TX |
Note:- Don't connect C1's Vcc with converter's Vcc ... it will fry your C1.
Now you are ready to connect the device through serial console and perform revealing the user and password.
Steps to reveal the password:
Step 1: Connect USB to serial TTL converter to PC and install Driver
After installing the driver find out the com port No from device manager.
 Opening device manager (Windows)
 > Open run window (Press windows key + R at once)
> Type dvmgmt.msc in textbox of run window
> Click Ok
> Under Ports(COM & LPT) of device manager window
> See the USB Serial Port (COMXX)
> Remember COMXX in my case is 15, it might different in your case.
Linux User
> Most of the linux platform automatically install the device driver as soon as you plugged in the device creates the virtual USBttyX port.
> Otherwise you consult device manufacture support website how to install.
Step 2: Install Putty (windows) or minicom (Linux) and configure.
 |
| Putty Serial Config |
(Windows)
> Open putty by Double Clicking putty icons from desktop.
> Click on Serial option and configure as picture.
Serial line to connect to:com15
Speed(baud):9600
Data bits:8
Stop bits:1
Parity:none
Row control:none
(note: Com15, this may different in your case)
 |
| Putty Session Config |
> Click on Session
> Configure as shown in figure.
Serial Line:COM15
Speed:9600
Connection type:Serial
(note: Com15, may differ in your case.)
> Click on Open Button
(Linux)
> Install minicom see your platform supported website how to install.
> In some platform super user is required to install software.
> Open terminal window and type minicom
> To configure minicom Press ALT + A
> Press Z
> Press P , shows connection parameter and make appropriate option.
make 9600@8n option and Press Enter
Step 3: Power up the CPE.
> Connect the network cable jack one end to C1 Ethernet port and another end to power supply(POE) AP/CPE labeled port. Leave the LAN port as it is, it is not needed now.
> Plugged in the poe power adapter to electric power socket.
As soon as your C1 is switched on you will see the booting information as following of your C1 device on the Putty or minicom window.

[ 0.000000] Linux version 2.4.27-ubnt0 (build@fwdev1) (gcc version 3.3.3) #2 Mon Jun 17 16:28:29 HKT 2013
[ 0.000000] Determined physical RAM map:
[ 0.000000] memory: 01000000 @ 00000000 (usable)
[ 0.000000] On node 0 totalpages: 4096
[ 0.000000] zone(0): 4096 pages.
[ 0.000000] zone(1): 0 pages.
[ 0.000000] zone(2): 0 pages.
[ 0.000000] Kernel command line: console=ttyS0,9600 console=ttyS0,9600 root=/dev/mtdblock2 rootfstype=squashfs init=/linuxrc ro
[ 0.000000] Using 92.000 MHz high precision timer.
[ 0.010000] Calibrating delay loop... 183.50 BogoMIPS
[ 0.310000] Memory: 14236k/16384k available (1332k kernel code, 2148k reserved, 92k data, 68k init, 0k highmem)
[ 0.440000] Dentry cache hash table entries: 2048 (order: 2, 16384 bytes)
[ 0.520000] Inode cache hash table entries: 1024 (order: 1, 8192 bytes)
[ 0.600000] Mount cache hash table entries: 512 (order: 0, 4096 bytes)
[ 0.680000] Buffer cache hash table entries: 1024 (order: 0, 4096 bytes)
[ 0.760000] Page-cache hash table entries: 4096 (order: 2, 16384 bytes)
[ 0.840000] Checking for 'wait' instruction... unavailable.
[ 0.900000] POSIX conformance testing by UNIFIX
[ 0.960000] Linux NET4.0 for Linux 2.4
[ 1.000000] Based upon Swansea University Computer Society NET3.039
[ 1.080000] Initializing RT netlink socket
[ 1.130000] Starting kswapd
[ 1.160000] Squashfs 2.2-r2 (released 2005/09/08) (C) 2002-2005 Phillip Lougher
[ 1.250000] pty: 256 Unix98 ptys configured
[ 1.300000] Serial driver version 5.05c (2001-07-08) with no serial options enabled
[ 1.390000] ttyS00 at 0xb1100003 (irq = 37) is a 16550A
[ 1.460000] PPP generic driver version 2.4.2
[ 1.510000] spiflash: JEDEC compatible device detected (Manufacturer: 0xC2; device: 0x2017)
[ 1.610000] mtd: adjusted dev mtd1 size from 61440 to 65536 bytes
[ 1.680000] Creating 8 MTD partitions on "spiflash":
[ 1.740000] 0x00000000-0x00040000 : "RedBoot"
[ 1.800000] 0x00040000-0x00140000 : "kernel"
[ 1.850000] 0x00140000-0x00790000 : "squashfs"
[ 1.900000] 0x00790000-0x007e0000 : "cfg"
[ 1.950000] 0x007e0000-0x007f0000 : "FIS directory"
[ 2.010000] 0x007ef000-0x007f0000 : "RedBoot config"
[ 2.070000] mtd: partition "RedBoot config" doesn't start on an erase block boundary -- force read-only
[ 2.180000] 0x007f0000-0x00800000 : "EEPROM"
[ 2.230000] 0x00040000-0x007e0000 : "Working flash"
[ 2.290000] Initializing Cryptographic API
[ 2.340000] NET4: Linux TCP/IP 1.0 for NET4.0
[ 2.390000] IP: routing cache hash table of 512 buckets, 4Kbytes
[ 2.460000] TCP: Hash tables configured (established 1024 bind 2048)
[ 2.540000] IPv4 over IPv4 tunneling driver
[ 2.590000] GRE over IPv4 tunneling driver
[ 2.640000] Linux IP multicast router 0.06 plus PIM-SM
[ 2.700000] NET4: Unix domain sockets 1.0/SMP for Linux NET4.0.
[ 2.770000] Ebtables v2.0 registered
[ 2.810000] NET4: Ethernet Bridge 008 for NET4.0
[ 2.870000] Bridge firewalling registered
[ 2.920000] 802.1Q VLAN Support v1.8 Ben Greear <greearb@candelatech.com>
[ 3.000000] All bugs added by David S. Miller <davem@redhat.com>
[ 3.080000] VFS: Mounted root (squashfs filesystem) readonly.
[ 3.150000] Freeing unused kernel memory: 68k freed
[ 3.210000] Warning: unable to open an initial console.
[ 3.760000] Algorithmics/MIPS FPU Emulator v1.5
[ 8.800000] AR5315 Ethernet detected
[ 8.910000] eth0: Dropping NETIF_F_SG since no checksum feature.
[ 8.980000] eth0: Atheros AR231x: xx:xx:xx:xx:xx:xx, irq 4
[ 9.590000] Copyright (c) 2005-2006 Atheros Communications, Inc. All Rights Reserved
BusyBox v1.01 (2013.06.17-08:30+0000) multi-call binary
Usage: insmod [OPTION]... MODULE [symbol=value]...
[ 10.860000] ar5312ChipReset qwxiao.................................ccc
[ 10.940000]
[ 10.960000]
[ 10.980000] ath_rate_setup.............................HAL_MODE_11G
[ 11.050000] ar5212GetRateTable .............ar5212_11g_table
[ 11.120000]
[ 11.140000] ic_sup_pureg_rates :: <0>12 Mbps
[ 11.190000] ic_sup_pureg_rates :: <1>18 Mbps
[ 11.250000] ic_sup_pureg_rates :: <2>24 Mbps
[ 11.300000] ic_sup_pureg_rates :: <3>36 Mbps
[ 11.360000] ic_sup_pureg_rates :: <4>48 Mbps
[ 11.420000] ic_sup_pureg_rates :: <5>72 Mbps
[ 11.470000] ic_sup_pureg_rates :: <6>96 Mbps
[ 11.530000] ic_sup_pureg_rates :: <7>108 Mbps
[ 11.580000]
[ 11.600000]
[ 11.620000] wifi0: 11b rates: 1Mbps 2Mbps 5.5Mbps 11Mbps
[ 11.680000] wifi0: 11g rates: 1Mbps 2Mbps 5.5Mbps 11Mbps 6Mbps 9Mbps 12Mbps 18Mbps 24Mbps 36Mbps 48Mbps 54Mbps
[ 11.800000] wifi0: mac 11.0 phy 4.8 radio 7.0
[ 11.860000] wifi0: Use hw queue 1 for WME_AC_BE traffic
[ 11.920000] wifi0: Use hw queue 0 for WME_AC_BK traffic
[ 11.980000] wifi0: Use hw queue 2 for WME_AC_VI traffic
[ 12.040000] wifi0: Use hw queue 3 for WME_AC_VO traffic
[ 12.110000] wifi0: Use hw queue 8 for CAB traffic
[ 12.160000] wifi0: Use hw queue 9 for beacons
net.ath00.debug: 0x0 => 0x800000<assoc>
PING 192.168.99.1(192.168.99.99): 56(84) data bytes
--- 192.168.99.1 ping statistics ---
3 packets transmitted, 0 packets received, 100% packet loss
Broadlink# login: broadlink[ 0.000000] Determined physical RAM map:
[ 0.000000] memory: 01000000 @ 00000000 (usable)
[ 0.000000] On node 0 totalpages: 4096
[ 0.000000] zone(0): 4096 pages.
[ 0.000000] zone(1): 0 pages.
[ 0.000000] zone(2): 0 pages.
[ 0.000000] Kernel command line: console=ttyS0,9600 console=ttyS0,9600 root=/dev/mtdblock2 rootfstype=squashfs init=/linuxrc ro
[ 0.000000] Using 92.000 MHz high precision timer.
[ 0.010000] Calibrating delay loop... 183.50 BogoMIPS
[ 0.310000] Memory: 14236k/16384k available (1332k kernel code, 2148k reserved, 92k data, 68k init, 0k highmem)
[ 0.440000] Dentry cache hash table entries: 2048 (order: 2, 16384 bytes)
[ 0.520000] Inode cache hash table entries: 1024 (order: 1, 8192 bytes)
[ 0.600000] Mount cache hash table entries: 512 (order: 0, 4096 bytes)
[ 0.680000] Buffer cache hash table entries: 1024 (order: 0, 4096 bytes)
[ 0.760000] Page-cache hash table entries: 4096 (order: 2, 16384 bytes)
[ 0.840000] Checking for 'wait' instruction... unavailable.
[ 0.900000] POSIX conformance testing by UNIFIX
[ 0.960000] Linux NET4.0 for Linux 2.4
[ 1.000000] Based upon Swansea University Computer Society NET3.039
[ 1.080000] Initializing RT netlink socket
[ 1.130000] Starting kswapd
[ 1.160000] Squashfs 2.2-r2 (released 2005/09/08) (C) 2002-2005 Phillip Lougher
[ 1.250000] pty: 256 Unix98 ptys configured
[ 1.300000] Serial driver version 5.05c (2001-07-08) with no serial options enabled
[ 1.390000] ttyS00 at 0xb1100003 (irq = 37) is a 16550A
[ 1.460000] PPP generic driver version 2.4.2
[ 1.510000] spiflash: JEDEC compatible device detected (Manufacturer: 0xC2; device: 0x2017)
[ 1.610000] mtd: adjusted dev mtd1 size from 61440 to 65536 bytes
[ 1.680000] Creating 8 MTD partitions on "spiflash":
[ 1.740000] 0x00000000-0x00040000 : "RedBoot"
[ 1.800000] 0x00040000-0x00140000 : "kernel"
[ 1.850000] 0x00140000-0x00790000 : "squashfs"
[ 1.900000] 0x00790000-0x007e0000 : "cfg"
[ 1.950000] 0x007e0000-0x007f0000 : "FIS directory"
[ 2.010000] 0x007ef000-0x007f0000 : "RedBoot config"
[ 2.070000] mtd: partition "RedBoot config" doesn't start on an erase block boundary -- force read-only
[ 2.180000] 0x007f0000-0x00800000 : "EEPROM"
[ 2.230000] 0x00040000-0x007e0000 : "Working flash"
[ 2.290000] Initializing Cryptographic API
[ 2.340000] NET4: Linux TCP/IP 1.0 for NET4.0
[ 2.390000] IP: routing cache hash table of 512 buckets, 4Kbytes
[ 2.460000] TCP: Hash tables configured (established 1024 bind 2048)
[ 2.540000] IPv4 over IPv4 tunneling driver
[ 2.590000] GRE over IPv4 tunneling driver
[ 2.640000] Linux IP multicast router 0.06 plus PIM-SM
[ 2.700000] NET4: Unix domain sockets 1.0/SMP for Linux NET4.0.
[ 2.770000] Ebtables v2.0 registered
[ 2.810000] NET4: Ethernet Bridge 008 for NET4.0
[ 2.870000] Bridge firewalling registered
[ 2.920000] 802.1Q VLAN Support v1.8 Ben Greear <greearb@candelatech.com>
[ 3.000000] All bugs added by David S. Miller <davem@redhat.com>
[ 3.080000] VFS: Mounted root (squashfs filesystem) readonly.
[ 3.150000] Freeing unused kernel memory: 68k freed
[ 3.210000] Warning: unable to open an initial console.
[ 3.760000] Algorithmics/MIPS FPU Emulator v1.5
[ 8.800000] AR5315 Ethernet detected
[ 8.910000] eth0: Dropping NETIF_F_SG since no checksum feature.
[ 8.980000] eth0: Atheros AR231x: xx:xx:xx:xx:xx:xx, irq 4
[ 9.590000] Copyright (c) 2005-2006 Atheros Communications, Inc. All Rights Reserved
BusyBox v1.01 (2013.06.17-08:30+0000) multi-call binary
Usage: insmod [OPTION]... MODULE [symbol=value]...
[ 10.860000] ar5312ChipReset qwxiao.................................ccc
[ 10.940000]
[ 10.960000]
[ 10.980000] ath_rate_setup.............................HAL_MODE_11G
[ 11.050000] ar5212GetRateTable .............ar5212_11g_table
[ 11.120000]
[ 11.140000] ic_sup_pureg_rates :: <0>12 Mbps
[ 11.190000] ic_sup_pureg_rates :: <1>18 Mbps
[ 11.250000] ic_sup_pureg_rates :: <2>24 Mbps
[ 11.300000] ic_sup_pureg_rates :: <3>36 Mbps
[ 11.360000] ic_sup_pureg_rates :: <4>48 Mbps
[ 11.420000] ic_sup_pureg_rates :: <5>72 Mbps
[ 11.470000] ic_sup_pureg_rates :: <6>96 Mbps
[ 11.530000] ic_sup_pureg_rates :: <7>108 Mbps
[ 11.580000]
[ 11.600000]
[ 11.620000] wifi0: 11b rates: 1Mbps 2Mbps 5.5Mbps 11Mbps
[ 11.680000] wifi0: 11g rates: 1Mbps 2Mbps 5.5Mbps 11Mbps 6Mbps 9Mbps 12Mbps 18Mbps 24Mbps 36Mbps 48Mbps 54Mbps
[ 11.800000] wifi0: mac 11.0 phy 4.8 radio 7.0
[ 11.860000] wifi0: Use hw queue 1 for WME_AC_BE traffic
[ 11.920000] wifi0: Use hw queue 0 for WME_AC_BK traffic
[ 11.980000] wifi0: Use hw queue 2 for WME_AC_VI traffic
[ 12.040000] wifi0: Use hw queue 3 for WME_AC_VO traffic
[ 12.110000] wifi0: Use hw queue 8 for CAB traffic
[ 12.160000] wifi0: Use hw queue 9 for beacons
net.ath00.debug: 0x0 => 0x800000<assoc>
PING 192.168.99.1(192.168.99.99): 56(84) data bytes
--- 192.168.99.1 ping statistics ---
3 packets transmitted, 0 packets received, 100% packet loss
Password:
Login incorrect
Broadlink# login: altai
Password:
Login incorrect
Broadlink# login: broadlink
Password:
Login incorrect
Broadlink# login:
You have seen above, every login entry failed, With out correct user and password you can not even logged in through serial mode too.
Then how to get inside? Ok, here are the tips:
This device firmware has some bug, lets know what is that.
Step 4: Interrupt boot process & login with default user and password:
a. Power off the device
b. Power on and let the device boot again
Monitor the boot process carefully
After the partition process completed
c. hold CTRL and Keep on strike X or C key from keyboard repeatedly
The (none) Login: shell appeared as follows
otherwise repeat the same process from step a to c again.
d. Use altai as login name and wag as password, you will logged in.
........
[ 3.150000] Freeing unused kernel memory: 68k freed
[ 3.210000] Warning: unable to open an initial console.
[ 3.760000] Algorithmics/MIPS FPU Emulator v1.5
[ 8.800000] AR5315 Ethernet detected
[ 8.900000] eth0: Dropping NETIF_F_SG since no checksum feature.
[ 8.980000] eth0: Atheros AR231x: 00:19:be:a0:93:bb, irq 4
do not read custom_profile
[: missing ]
(none) login: altai
Password:
Jun 17 16:36:40 login[158]: root login on `ttyS0'
BusyBox v1.01 (2013.06.17-08:30+0000) Built-in shell (ash)
Enter 'help' for a list of built-in commands.
(none)->ls
ant dev lib proc tmp var wwwzh
bin etc linuxrc sbin usr www
(none)->
5. Find out the default user and password defined by broadlink:
The customized configuration with default user and password is stored on the file /etc/new_wlan/newapcfg.default and current configuration with user and password stored on /etc/new_wlan/newapcfg. If you made some misconfiguration or hard reset the device the configuration from /etc/new_wlan/newapcfg.default is loaded so that the current user and password you found from others do not matched.
Type following command:
(none)->cd new_wlan
SGNAME user# ## General user name
SGPSWD password# ## General user passward
SUNAME broadlink# ## Adminatation user name
SPSSWD tumiikemonnachoo# ## Adminatation user password
SCUSTM Broadlink# ## Customer's company name
SCMAIL support@broadlink.com# ## Technical Support
SCWEB www.broadlink.com# ## Company Web Site
RPWER0 25# ## Tx power
BSTAT0 1# ## VAP0 "1" up, "0" down
BWDSE0 1# ## VAP0 WDS: "1" enable, "0" disable
BSSID0 Broadlink WIFI# ## VAP0 ssid
RADST0 2000# ## Express the distance is 2Km
6. Permanently change the customized configuration of broadlink:
If you want to permanently remove the customized configuration, user and password of broadlink and use the default of altai then just rename or remove the file /etc/new_wlan/neapcfg.default, then type save command and reboot.
After then the default login user will be altai and password is wag. After first logged in change the password as your need.
Type command as shown int the figure:
That all. Now you can use this device for other purposes at your home, office or with other ISP too.
(none)->ls
apcfg newapcfg newapcfg.default tr_conf
customer_logo.gif newapcfg.bak newapcfg.web umconfig.txt
(none)->cat newapcfg.default
customer_logo.gif newapcfg.bak newapcfg.web umconfig.txt
(none)->cat newapcfg.default
SGNAME user# ## General user name
SGPSWD password# ## General user passward
SUNAME broadlink# ## Adminatation user name
SPSSWD tumiikemonnachoo# ## Adminatation user password
SCUSTM Broadlink# ## Customer's company name
SCMAIL support@broadlink.com# ## Technical Support
SCWEB www.broadlink.com# ## Company Web Site
RPWER0 25# ## Tx power
BSTAT0 1# ## VAP0 "1" up, "0" down
BWDSE0 1# ## VAP0 WDS: "1" enable, "0" disable
BSSID0 Broadlink WIFI# ## VAP0 ssid
RADST0 2000# ## Express the distance is 2Km
SUNAME (super user name)username: broadlink#
SPSSWD (super user pass)password: tumiikemonnachoo#
6. Permanently change the customized configuration of broadlink:
If you want to permanently remove the customized configuration, user and password of broadlink and use the default of altai then just rename or remove the file /etc/new_wlan/neapcfg.default, then type save command and reboot.
After then the default login user will be altai and password is wag. After first logged in change the password as your need.
Type command as shown int the figure:
>cd etc
>cd new_wlan
>cp newapcfg.default newapcfg.default.bak
>rm newapcfg.default
>save
>reboot
 | ||
| Rename newapcfg.default |

1 commSimple template. Powered by Blogger.