KEIMPX
INTRODUCTION
keimpx is an open source tool, released under a modified version of Apache License 1.1.
It can be used to quickly check for the usefulness of credentials across a network over SMB. Credentials can be:
- Combination of user / plain-text password.
- Combination of user / NTLM hash.
- Combination of user / NTLM logon session token.
If
any valid credentials has been discovered across the network after its
attack phase, the user is asked to choose which host to connect to and
which valid credentials to use, then he will be prompted with an
interactive SMB shell where the user can:
- Spawn an interactive command prompt.
- Navigate through the remote SMB shares: list, upload, download files, create, remove files, etc.
- Deploy and undeploy his own service, for instance, a backdoor listening on a TCP port for incoming connections.
- List users details, domains and password policy.
HOW TO OPEN KEIMPX ON BACKTRACK 5
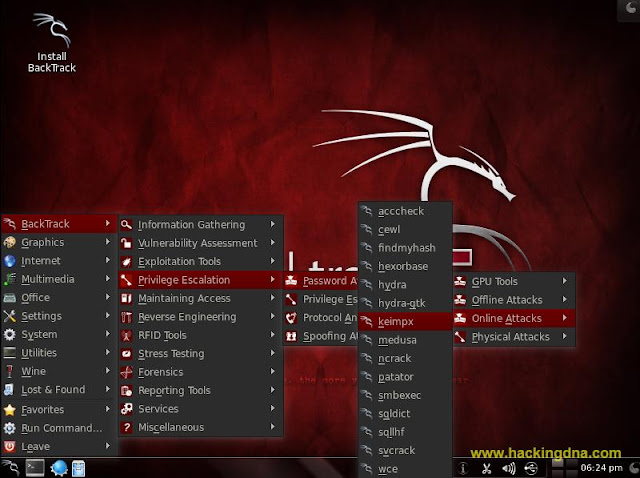
- To open keimpx , follow the path -
- BackTrack > Priviledge Escalation > Password Attacks > Online Attacks > keimpx
- See the below image for more help -
LOGGING TARGET MACHINE
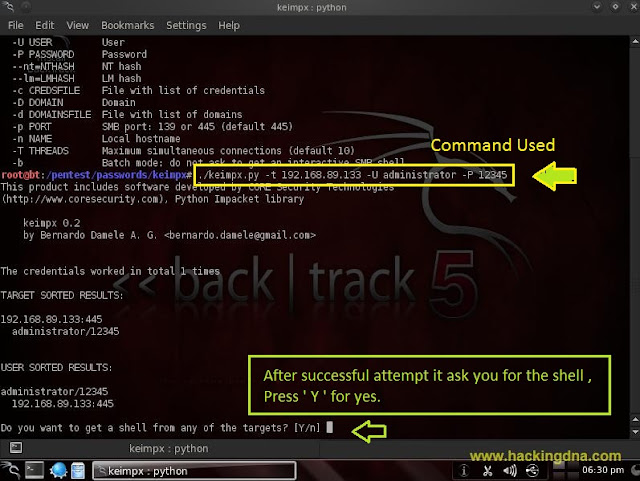
- In this step , you need the username and password then only you can successfully login to the target machine .
- Command Used : ./keimpx.py -t < target ip > -U < username > -P < password >
- See the below image for live example -
WANNA WINDOWS SHELL ON BACKTRACK 5 ?
- Now it ask you --> Do you want to get a shell from any of the target ? [ Y/n ]
- Always Press yes otherwise , if you enter no then the program will exit .
- See the below image for more details -
SELECT TARGET and CREDENTIALS
- In this step , it will ask you which target you want to connect to ? And which credentials do you want to use to connect ?
- In my case there is only 1 target , but in real case senario it will show many targets .
- So according to my case , enter key 1 on both the query and press enter key .
- See the below image for more details -
- Now whenever you see # sign , it means you are " inn " keimpx and now you can use all the commands supported by keimpx .
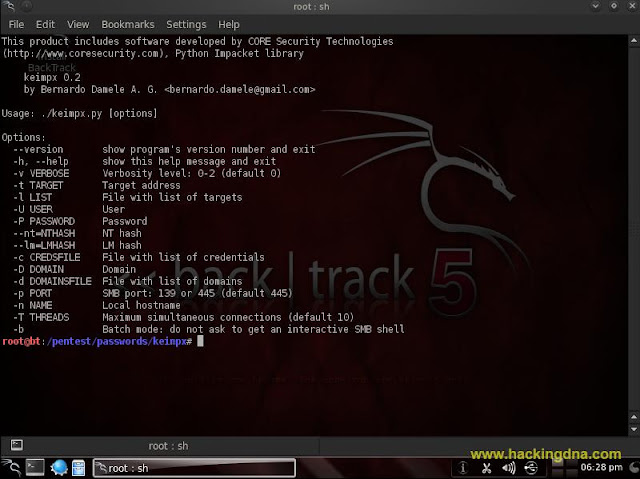
HELP COMMAND
- Lets start with the help command .
- This command display all the options supported by keimpx like -
- Generic Options
- Shares Options
- Services Options
- Shell Options
- Users Options
- Registry options
- See the below image for more help -
Info Command
- This command list the remote/target system information .
- See the below image how to use this command -
SHARES
- This command will display the available shares .
- Command Used : shares
- As yoy press enter key , it display all the available shares and also ask you " which share do you want to connect to ?
- See the below image for more details -
USE COMMAND
- This command is used to connect specific shares .
- Command Syntax : use { sharename }
- See the below image for the example-
ls command
- This command will list all the files and current directories .
- See the below image for more details -
UPLOAD FILE
- To upload file on remote/target machine , you can use the upload command .
- Command Syntax : upload{ filename }
- See the below image for more details -
DOWNLOAD FILE
- To download file from the remote/target machine , you can use the download command .
- Command syntax : download { filename }
- See the below image for more details -
REMOVING FIL
- To remove file from remote machine , we use the " rm command " .
- Command Syntax : rm { filename }
- See the below example to understand how to use remove command .
REMOVING DIRECTORY
- Above
you see how to remove the file , now here you learn how to remove
directory from the remote /target machine through your Backtrack 5 .
- Command Syntax : rmdir { directory-name }
- See the below image for more details -
DOMAIN
- List the domain which the system is part of.
- See the below example for more help-
CAT COMMAND
- You can use command to view file . Here in my case I used cat command to view hackingDNA file .
- See the below image for more details -
WINDOWS SHELL
- To get the shell , enter the shell command .
- Command Used : shell
- See
the below image as soon you enter the ' shell ' command it display the
windows shell on backtrack 5 ( See the below image ) -
IPCONFIG COMMAND
DIR COMMAND
USERS
- It list the users .
- Command Used : users
- See the below image for the output of this command -
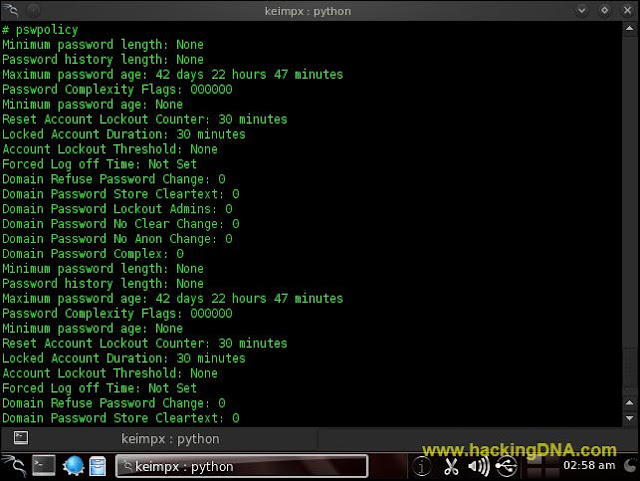
PASSWORD POLICY
- List the password policy.
- Command Used : pswpolicy
- See the below image for the output -
EXIT COMMAND
- At last " exit command " , it simply used to exit from the program or terminal .
- See the below image for more details -
- Its a good tool developed by Bernardo Damele .
- Working
with this tool had a great experience , A one small application gives
you so much of information about your target . Isn't it great .
- Many more things you can do " try it , learn it and gain it ". ,
- I hope you like it , if yes come and join our facebook page
THIS TUTORIAL IS JUST FOR EDUCATIONAL PURPOSE ONLY /-
|




Comments